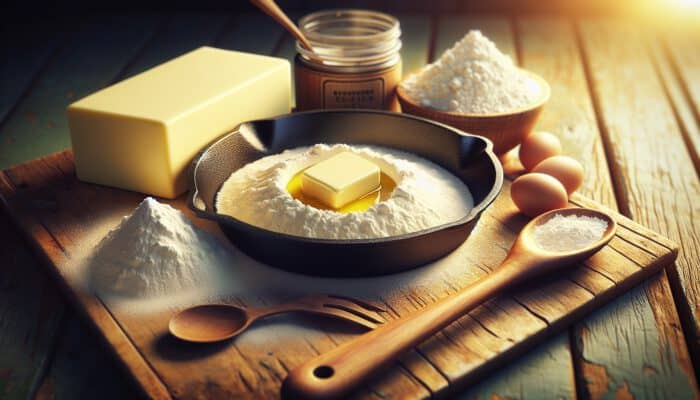
Essential Ingredients for Crafting a Perfect Roux
Choosing the Right Types of Flour for Roux
How to Make a Roux for Thick Sauces: The essential building block of any roux is strong flour, which has a high gluten content, providing a solid foundation for thickening sauces. While all-purpose flour is the most commonly used option due to its accessibility and versatility, you may want to explore alternatives such as whole wheat flour or rice flour for a more complex flavour. Whole wheat flour adds a nutty undertone, whereas rice flour can create a lighter texture, perfect for more delicate sauces. By experimenting with flour combinations, such as mixing all-purpose with whole wheat, you can strike a balance that enhances your sauce without overwhelming it.
Furthermore, gluten-free flour varieties like almond or chickpea flour are gaining popularity among health-conscious cooks. When selecting flour, consider its protein content; higher-protein flours yield a thicker dough. To achieve the best results, consider testing small batches to identify the perfect blend that satisfies both your flavour and thickening needs.
In professional kitchens worldwide, chefs often experiment with different flours to determine which pair best with specific sauces. For example, semolina flour can elevate the texture of a cheese sauce, while blending various flours may help achieve the ideal viscosity for a rich gravy. Understanding the unique characteristics of each flour type and how they respond to heat is key to mastering roux-making.
Choosing the Right Fats for Roux Preparation
The choice of fat in roux preparation is crucial, as it significantly impacts the final texture and flavour of your sauce. Butter is the traditional choice, renowned for its rich flavour and ability to create a silky base. However, alternatives such as olive or canola oil can be highly effective, especially in recipes that require a lighter touch. The primary objective is to strike a balance between fat and flour to ensure seamless ingredient integration.
When using butter, melt it over low heat to avoid burning. It is generally advisable to use unsalted butter, as this allows you to exert greater control over the seasoning of your final dish. For those wishing to try something new, ghee can be an exciting alternative; its high smoke point makes it ideal for high-heat cooking, and it contributes a unique flavour profile.
Ultimately, the right consistency of your roux depends on the type of fat you use and how you handle it during cooking. For a richer sauce, consider incorporating a touch of bacon fat or duck fat to add depth. Be mindful that fats with pronounced flavours should be used sparingly, as they can easily dominate the overall taste of your sauce.
Precision Measuring for Successful Roux Preparation
Accurate measurement of ingredients is vital in roux preparation, as it determines the sauce’s thickness and texture. The classic roux ratio is generally equal parts flour and fat by weight; however, adjusting these ratios can yield different results. For instance, using slightly more flour yields a thicker roux, making it ideal for gravies, while a higher fat-to-flour ratio works well for cream sauces.
Using a kitchen scale helps ensure precise measurements, resulting in consistent results every time you cook. If you don’t have a scale, you can also use the volume method—measuring cups suffice —but be careful not to pack the flour too tightly, as this can lead to unintended thickness.
As you mix the flour and fat, use a whisk to incorporate them smoothly and avoid lumps. This technique not only facilitates even distribution but also prevents clumping. With practice, you will become proficient at balancing these components, resulting in better sauce outcomes.
Proven Techniques for Creating Roux for Thick Sauces
Advanced Techniques for Flour Integration in Roux
Mastering the art of integrating flour in roux preparation can significantly enhance your sauce-making capabilities. One advanced method involves gently heating the flour before adding it to the fat. This technique, known as pre-toasting, allows the flour to develop a nutty flavour, which enhances the overall taste of the sauce.
Maintaining the right temperature is essential; the fat should be warm but not smoking, creating an ideal environment for the flour to cook evenly. Gradually whisk in the flour to prevent clumping, and continue stirring until the mixture is smooth. By paying close attention to the colour of the roux, you can create various flavour profiles—from a pale blonde roux, perfect for béchamel sauces, to a darker brown roux suited for hearty gumbo.
Additionally, using sifted flour can result in a finer texture, which is especially beneficial when crafting velvety sauces. Gradually incorporate flour, allowing it to absorb moisture without forming lumps. This technique ensures a luxurious mouthfeel in your finished sauces.
Experts recommend practising advanced techniques to refine your skills further. Over time, you will develop an intuition for the appropriate colour and consistency needed for various sauces, leading to a more confident and rewarding cooking experience.
Strategies for Selecting the Right Fats
When selecting fats for your roux, understanding the unique properties of each option can significantly enhance the sauce’s quality. While butter remains the gold standard for its richness, incorporating clarified butter (ghee) can add depth of flavour and a higher smoke point during cooking.
Olive oil, with its fruity notes, is excellent for Mediterranean-inspired sauces, whereas coconut oil adds a subtle sweetness, making it ideal for tropical or Asian dishes. Consider the following characteristics when selecting fats:
- Smoke Point: High-smoke-point fats, such as avocado oil, are ideal for high-heat cooking.
- Flavour Profile: Choose fats that complement the sauce; for instance, bacon fat enriches gravies.
- Health Considerations: Olive and avocado oils are heart-healthy options worth exploring.
- Texture Consistency: Butter contributes creaminess, while oils may yield a lighter result.
By employing a thoughtful approach to fat selection, you can create sauces that not only thicken beautifully but also carry a rich tapestry of flavours. Remember, the ultimate goal is to complement—never overshadow—the other ingredients in your sauce.
Consistency Monitoring Techniques
Expert knowledge can significantly enhance the outcomes of your roux, particularly when it comes to achieving the perfect thickness. Monitoring the consistency of your roux during cooking is paramount. Start by observing the texture as you combine the flour and fat; it should form a paste that coats the back of a spoon easily.
To check for optimal thickness, perform the spoon test: dip a spoon into the roux and observe how it clings. If it drips off easily, it may need more cooking time to reach the desired viscosity. This technique allows you to catch any inconsistencies before incorporating the roux into your sauce.
Another key method involves using visual cues based on colour changes. A roux that has reached the right stage will have a silky appearance and a slight sheen. As it cooks, subtle shifts in colour can indicate deeper flavour development.
Understanding these checks not only helps refine your technique but also instils confidence in your ability to produce consistent results in sauce preparation—ultimately enhancing your overall cooking repertoire.
What Are the Steps to Prepare Roux?
Initial Mixing Techniques for Roux
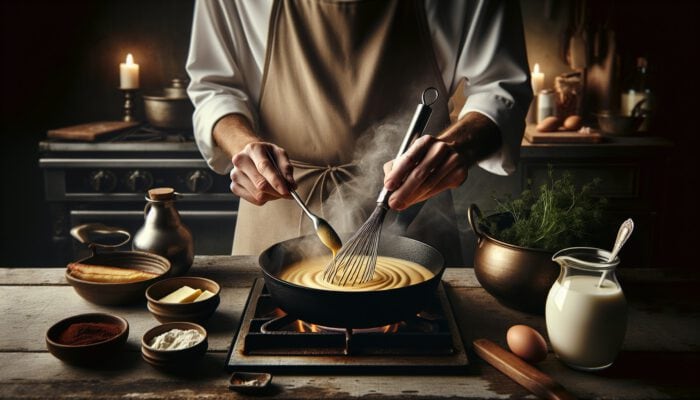
The foundation of any successful roux lies in the meticulous initial mixing of ingredients. Start by selecting your preferred fat, melting it over low heat in a saucepan. The goal is to create a smooth, even base without allowing the fat to smoke or burn. Once the fat has fully melted, gradually sprinkle in the flour while continuously whisking. This step is crucial for preventing lumps from forming and ensuring the ingredients integrate seamlessly.
As you stir, keep a close eye on the heat. A temperature that is too high can lead to burning, while one that is too low may result in a sluggish roux that doesn’t thicken effectively. The mixture should form a cohesive paste, thick enough to pull away from the sides of the pot. Stirring consistently at this stage is key; a steady motion will help cook the flour evenly, allowing it to absorb the fat and develop flavour.
Once the roux begins to bubble gently, you can gradually increase the heat, but remain vigilant to avoid browning the mixture too quickly. This initial mixing phase sets the stage for the roux’s transformation, and patience is essential. The longer you stir, the more complex the flavours will become, leading to a robust base for your sauces.
Guidelines for Cooking Time
Cooking time for a roux varies by desired colour; generally, cook a blonde roux for three to five minutes, and darker varieties for ten to fifteen minutes. The longer you cook it, the deeper the flavour profile develops, so it’s essential to balance timing with the desired taste.
During this cooking phase, the roux transforms, gradually changing colour from pale cream to a rich golden hue. Achieving depth requires constant stirring, which prevents the mixture from sticking to the bottom of the pan and burning. As the roux cooks, you will begin to notice a nutty aroma as the flour toasts—a clear sign of progress.
For lighter sauces such as béchamel, aim for a brisk three minutes of cooking. In contrast, for hearty sauces like gumbo, allow for a longer cooking time to develop a richer colour and flavour. Always adjust your expectations based on the sauce you’re preparing; the versatility of roux allows flexibility in timing, depending on the desired result.
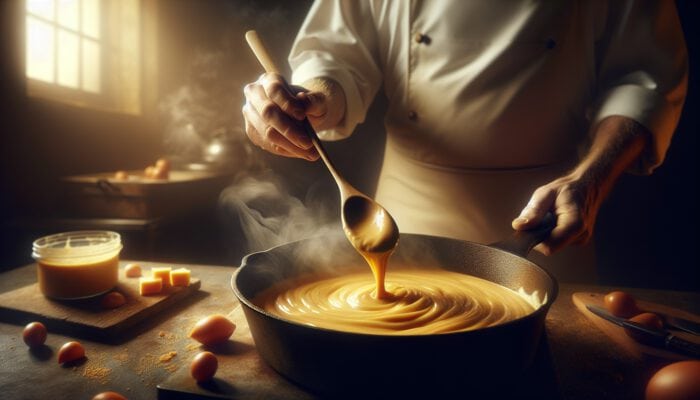
Assessing Roux Readiness
Recognising when your roux is ready for use is an essential skill that can make or break a sauce. Visual and textural cues are invaluable for determining doneness. One reliable indicator is the colour; a roux that has reached the desired stage will exhibit a consistent hue throughout, whether it’s a pale blonde or a deep brown, depending on your target sauce.
Another technique for testing a roux’s readiness is to check its texture. Dip a spoon into the roux and assess its consistency. It should be thick enough to coat the back of the spoon without running off too quickly. If it drips too easily, it may require additional cooking time.
Lastly, pay attention to the aroma; as the roux reaches the right stage, it will emit a toasted, nutty fragrance that indicates proper cooking. By recognising these signs and practising regularly, you will confidently assess your roux’s readiness, ensuring it serves as an excellent base for your sauces.
Research-Backed Benefits of Making Roux for Thick Sauces
Nutritional Benefits of Incorporating Roux
Utilising a roux in sauce preparation offers significant nutritional benefits, primarily by binding ingredients. By incorporating flour into your sauce, you not only enhance texture but also improve the dish’s overall nutritional profile. This aspect is particularly relevant in recipes aiming to provide balanced meals, as roux can help seamlessly integrate various components, such as proteins and vegetables.
Creating a roux enables the emulsification of fats and liquids, which can lead to a healthier final product. For instance, when making a cream sauce, substituting heavy cream with a lighter stock thickened with a roux can reduce calories without compromising flavour. This approach encourages creativity in crafting sauces that cater to dietary needs while ensuring they remain delicious.
Moreover, a roux can serve as an excellent medium for incorporating various herbs and spices, thereby enhancing the nutritional value of sauces. By using spices known for their health benefits, such as turmeric or garlic, you can elevate your dish’s nutritional profile while also enhancing its overall flavour.
Techniques for Enhancing Flavour with Roux
Roux serves as both a thickener and a powerful enhancer of flavour in sauces. When prepared correctly, it introduces a depth that is often lacking in sauces made with cornstarch or other thickeners. To maximise flavour, consider employing the following techniques:
- Toasting the flour: Cook the flour longer to develop a nuttier taste, particularly for darker roux.
- Add aromatics: Introduce finely chopped onions, garlic, or shallots to the fat before adding the flour for a flavour boost.
- Use rich stocks: opt for homemade or high-quality stocks instead of water to enhance richness.
- Layer spices: Add spices gradually during the roux preparation to build layers of flavour.
These practices not only enhance the taste profile but also ensure the sauce complements the main dish. The artistry of roux lies in its versatility; by adjusting the ingredients and techniques, you can create an array of sauces that tantalise the palate, making your culinary creations truly stand out.
Improving Texture with Roux
The reliability of roux in thickening sauces stems from its unique ability to create a silky, smooth texture that enhances mouthfeel. This quality is particularly crucial when preparing sauces intended to coat pasta, meats, or vegetables. The process of creating a roux allows for an emulsion that combines fat and liquid, resulting in a stable mixture that does not easily separate.
To ensure silky results, maintaining the correct temperature is essential. A low-and-slow cooking approach allows the flour to fully hydrate and absorb the fat, resulting in a smoother texture. As you incorporate the liquid into the roux, do so gradually while whisking continuously to prevent lumps from forming.
Practising these techniques will improve consistency across various recipes. For instance, when making a cheese sauce, adding a roux creates a luscious, creamy texture that envelops the cheese, preventing clumping. This dependable thickening method distinguishes the roux from other methods, making it a preferred choice for chefs worldwide.
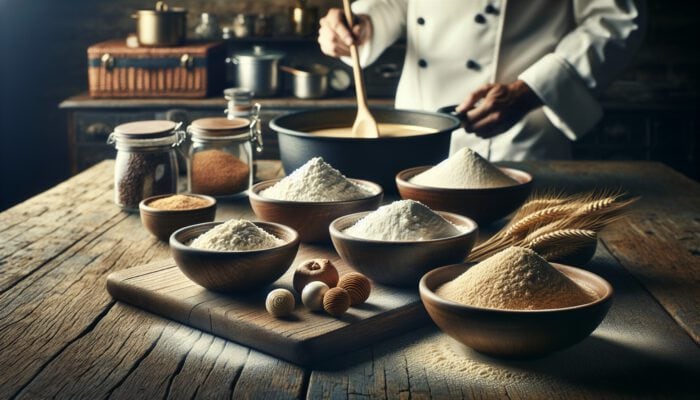
What Tools Are Essential for Making Roux?
Essential Kitchen Equipment for Roux Preparation
Having the right tools is crucial for successful roux preparation. A sturdy saucepan is essential because it allows even heat distribution, preventing hotspots that can cause burning. Opt for one with a heavy bottom for optimal results. A whisk is essential for combining flour and fat efficiently and achieving a smooth texture.
Additionally, a wooden spoon or silicone spatula can help stir, provide control, and prevent scratches on nonstick surfaces. A heat-resistant spoon is beneficial for tasting, allowing you to assess the flavour as you go. Having a measuring cup and spoon on hand will streamline the process and ensure accurate ingredient ratios.
These tools lay the groundwork for good technique, enabling you to focus on perfecting your roux. Familiarity with your kitchen equipment will enhance your efficiency and comfort level, fostering a more enjoyable cooking experience, whether you’re a novice or a seasoned chef.
Alternative Utensils for Roux Making
While specific kitchen tools are recommended for roux preparation, several alternatives can work just as effectively. If you don’t have a whisk, a fork can serve as a suitable substitute for mixing your flour and fat. While it may require slightly more effort, it can yield similar results.
Instead of a whisk, a hand mixer can also be used, especially when preparing a larger batch of roux. Be careful not to overmix; the goal is to maintain a smooth yet cohesive texture.
If a saucepan isn’t available, a deep-frying pan can also serve the purpose; ensure it has a heavy base to avoid uneven cooking. Adaptability in the kitchen is key, and knowing how to substitute tools effectively will empower you to pursue your culinary creativity without limitations.
Practical Storage Solutions for Kitchen Tools
Proper storage of your kitchen tools is critical for maintaining usability and longevity. Invest in a well-organised utensil holder or drawer to keep your whisk, spatula, and measuring cups accessible and tidy. Regularly clean your tools to prevent residue build-up, particularly for items that come into contact with fats, which can become rancid over time.
For nonstick pans, avoid metal utensils that can scratch the surface; instead, opt for silicone or wooden utensils. This practice not only preserves your cookware but also creates a safe cooking environment.
When storing your roux, if you prepare it in batches, consider using airtight containers. Label them with the date to ensure freshness, and store them in a cool, dry place. Following these guidelines will prolong the life of your kitchen tools and ensure they remain ready for your next sauce-making adventure.
Measuring Tools for Precision
Accurate measuring tools are essential to successful roux preparation, ensuring the correct fat-to-flour ratio. A set of measuring cups and spoons should be standard in any kitchen. Look for dry measuring cups for flour and liquid measuring cups for fats. Pay close attention to how you fill your measuring cups to avoid packing flour too tightly, which can lead to thickness discrepancies.
Utilising a digital kitchen scale can enhance precision, particularly when working with larger quantities or intricate recipes. Weighing exact amounts ensures consistency and removes guesswork, making it easier for both beginners and experienced cooks to achieve desired results.
Incorporating these measuring tools into your routine can significantly reduce cooking errors, allowing for a more enjoyable and successful sauce-making experience. As you become more familiar with the tools and techniques, you’ll find that achieving the perfect roux becomes second nature.
Safety Equipment for Kitchen Use
Safety should always be a priority in the kitchen, especially when working with hot fats and liquids. Investing in heat-resistant gloves is vital for protecting your hands while handling pots on the stove, allowing you to manoeuvre without fear of burns. Likewise, a splatter guard can be beneficial during roux preparation, as it prevents hot fat from splattering and creating a mess.
Ensure that your work area is uncluttered to minimise the risk of accidents. This practice not only promotes safety but also enhances efficiency during cooking. Familiarise yourself with your kitchen layout, ensuring your most-used tools are within easy reach when preparing sauces.
Overall, prioritising safety can transform your cooking experience, enabling you to focus on mastering techniques without undue concern. By equipping yourself with the proper safety tools, you create an environment that fosters creativity and confidence in the kitchen.
Reliable Strategies for Crafting Roux for Thick Sauces
Effectively Layering Flavours in Your Roux
Incorporating aromatics into your roux can significantly elevate the overall flavour profile of your sauces. Begin by finely chopping ingredients such as onions, garlic, or shallots, and add them to the melted fat before incorporating the flour. Sauté these aromatics gently until they become translucent, allowing their essential oils to infuse the fat and create a robust foundation for your sauce.
Once your aromatics become fragrant, gradually add the flour while continuing to whisk. This not only ensures a well-integrated roux but also allows the flavours to meld seamlessly. Experiment with herbs such as thyme and rosemary, or spices such as paprika, to enhance the flavour further. These additions add layers of complexity, enriching your sauce and making it more dynamic and appealing.
Another effective strategy is to introduce liquid ingredients later in the cooking process. This allows the roux to maintain its integrity while still absorbing flavours from stocks or wines, resulting in a well-rounded sauce. The key lies in timing: add the liquid gradually once the desired roux colour is achieved, ensuring all components harmonise.
Adjusting the Thickness of Roux on Demand
Experience plays a significant role in adjusting the thickness of your roux mid-process. If your sauce is too thick, whisk in a small amount of liquid, such as stock or wine, until the desired consistency is reached. This method allows for flexibility in recipe execution, accommodating variations in ingredient moisture content.
Conversely, if your sauce is too thin, you can create a slurry by mixing a small amount of flour with cold water, then gradually whisking it into the simmering sauce. This technique ensures you don’t end up with lumps while further thickening the sauce.
Understanding how to modify your roux in real-time will boost your confidence in the kitchen. Practising these adjustments will help you develop an instinct for the ideal texture, allowing you to adapt recipes according to personal preference or dietary restrictions effortlessly.
Scaling Roux for Larger Batches
When preparing larger quantities of roux, it’s essential to maintain the same ratios to ensure quality is not compromised. For every cup of fat, use an equal amount of flour; this consistency is vital, especially when creating sauces for gatherings or events.
Consider using a larger pot or pan to accommodate the increased volume and ensure even cooking. Stirring is even more critical in larger batches to prevent burning and ensure the roux cooks uniformly.
Utilising a larger whisk or a hand mixer can speed up the mixing process, making it easier to incorporate ingredients without excessive effort. Additionally, scaling up may require longer cooking times for a darker roux, so monitor colour and aroma to gauge readiness.
These techniques will help you confidently prepare larger batches of roux, ensuring your sauces maintain their flavour and texture, regardless of scale.
Mastering Roux Cooking Techniques
Mastering roux techniques requires understanding heat management and proper stirring to achieve an impeccable finish. Start by melting your fat over medium-low heat, allowing it to warm gradually without reaching a smoke point. This gentle approach ensures the flour incorporates smoothly without clumping or burning.
When adding flour, whisk continuously to prevent any lumps from forming. The motion should be firm yet fluid, encouraging even distribution. As the roux cooks, pay attention to colour changes; a blonde roux will take only a few minutes, while a darker roux requires patience and constant stirring for up to fifteen minutes.
Common pitfalls to avoid include overheating the roux, which can lead to a bitter taste, and neglecting to whisk, which can result in dangerous clumping. By mastering the art of stirring and temperature control, you can create a flawless roux every time, resulting in sauces that boast a silky texture and rich depth of flavour.
Troubleshooting Common Roux Issues
Identifying and rectifying roux issues is an invaluable skill in the kitchen. If you encounter lumps, whisk vigorously to break them down; if that fails, consider using a blender or immersion blender to achieve a smooth consistency.
If your roux becomes too thick, gradually add liquid while whisking to thin it. Conversely, if it’s too thin, create a slurry with flour and cold water and incorporate it slowly into the sauce to adjust the consistency.
Another common issue is burning. If you notice a burnt smell or dark bits, you may need to start over, as burnt roux can impart an unpleasant flavour to the sauce. Awareness of these potential pitfalls, coupled with quick-fix strategies, will enhance your roux-making skills, ensuring your sauces remain high-quality and delicious every time.
How to Effectively Use Roux in Sauces?
Seamless Integration of Roux into Recipes
Integrating roux into your recipes for thickening is an art that requires precision and timing. Once your roux has reached the desired colour and consistency, gradually pour in your chosen liquid—such as stock, milk, or cream—while whisking continuously. This step ensures that the liquid incorporates smoothly into the roux without forming lumps.
As you pour, monitor the sauce’s thickness; if it appears too thick, add a bit more liquid until you achieve the desired consistency. Remember to simmer the sauce gently, as this will allow the flavours to meld and thicken further.
Timing is crucial; add the roux to your sauce base at the right moment to ensure it provides optimal thickening. For instance, when making a cheese sauce, gradually incorporate the roux into the warm milk, allowing it to thicken before adding the cheese. This technique yields a creamy, smooth texture indispensable for pasta dishes or casseroles.
Adapting Roux for Various Sauces
Roux-based sauces are incredibly versatile, and adapting them to suit your culinary needs is straightforward. For creamy sauces, such as a classic béchamel, use milk as the primary liquid and incorporate grated cheese for a rich sauce.
Alternatively, for hearty sauces such as gravy, use meat stock or broth and whisk in pan drippings for depth. When crafting a spicy sauce, consider adding heat by incorporating diced chiles or hot sauce into your roux before adding liquid.
Experiment with various liquids and flavourings to create custom sauces that fit a variety of dishes. This adaptability allows you to tailor each sauce to the specific cuisine you’re making, ensuring that your dishes stand out and cater to diverse tastes.
Final Blending Techniques for Roux-Based Sauces
Finishing touches are essential in achieving the perfect roux-based sauce. Once your sauce has thickened to your liking, consider a gentle simmer to meld the flavours further. If you’re looking to enhance the texture, whisk in a small pat of cold butter right before serving, adding gloss and richness to the sauce.
If you prefer a smoother finish, blend the sauce with an immersion blender or stand blender for an ultra-smooth texture ideal for fine-dining presentations.
Standard adjustments at this stage may include seasoning to taste—salt, pepper, or fresh herbs can dramatically alter the flavour profile. Additionally, consider adding a splash of vinegar or lemon juice for brightness, enhancing the overall appeal of your sauce.
These final blending techniques will allow you to elevate your roux-based sauces, ensuring they are not only delicious but also visually appealing on the plate.
Essential Tips for Mastering Roux
Regular Practice Routines for Roux Mastery
Developing a routine for practising roux skills can significantly enhance your sauce-making abilities. Start by committing to making a basic roux once a week, focusing on refining your technique each time. Explore different flour types and fats to gain a deeper understanding of how each variable affects the outcome.
To build confidence, consider preparing a series of sauces that utilise roux as a base, such as gravies, cheese sauces, or creamy soups. By replicating these recipes, you’ll develop muscle memory and a keen eye for achieving the right colour and consistency.
Incorporate feedback sessions by tasting your sauces and noting areas for improvement. Over time, this routine will lead to significant improvements in your roux mastery, enabling you to create standout sauces effortlessly.
Troubleshooting Common Roux Issues
Addressing common roux issues promptly helps maintain sauce quality and prevent frustration. If you encounter lumps in your roux, vigorous whisking can often break them down; if that fails, consider blending to achieve a smooth consistency.
If your roux appears too thick, gradually whisk in more liquid, and if it’s too thin, a quick slurry can help adjust it. Should you accidentally burn your roux, it’s best to start afresh, as the burnt taste can taint your sauce.
By becoming familiar with these troubleshooting techniques, you’ll build confidence in managing any issues that arise during roux preparation, ensuring a smoother cooking experience.
Proper Storage of Prepared Roux
Proper storage of prepared roux is essential for maintaining its effectiveness for future use. Allow the roux to cool completely before transferring it to an airtight container. It can be stored in the refrigerator for up to a week or frozen for up to three months.
For freezing, consider portioning the roux into ice cube trays. This method lets you thaw only the amount you need for quick use in sauces, reducing waste.
When ready to use, gently reheat the roux on the stove, whisking to restore its smooth texture before incorporating it into your sauce. Following these storage practices will ensure your roux stays fresh and ready whenever you need it, making sauce preparation a breeze.
Frequently Asked Questions (FAQs)
What is a roux, and what is its purpose in sauces?
A roux is a mixture of flour and fat, typically butter, used to thicken sauces. It creates a smooth texture and helps bind ingredients, enhancing the sauce’s overall flavour.
How long can I store roux in the fridge?
Prepared roux can be stored in the refrigerator for up to one week. Ensure it is in an airtight container to maintain freshness.
Can I make roux with gluten-free flour?
Yes, gluten-free flours, such as almond or rice flour, can be used to make a roux. However, the texture and thickening properties may differ from those of regular flour.
What are the different types of roux?
There are three main types of roux: white (cooked briefly), blonde (cooked until lightly golden), and brown (cooked longer for a dark colour). Each type serves different culinary purposes.
How do I avoid lumps in my roux?
To avoid lumps, whisk the flour into the fat gradually, ensuring it is well combined before adding any liquid. Continuous stirring is crucial for achieving a smooth mixture.
Can I use olive oil instead of butter for a roux?
Yes, you can use olive oil or other fats, such as coconut or ghee, in place of butter. Each option will slightly alter the flavour and texture of the resulting sauce.
What is the ideal ratio of flour to fat for roux?
The classic ratio for roux is equal parts flour and fat by weight. This balance helps to achieve a consistent thickness in sauces.
How do I know when my roux is ready?
A roux is ready when it reaches the desired colour—pale for white, golden for blonde, and dark brown for brown—along with a nutty aroma, indicating its toastiness.
Can I freeze prepared roux?
Yes, roux can be frozen. Pour it into ice cube trays or airtight containers and freeze for up to three months for later use in sauces.
What sauces can I make with roux?
Roux can be used to thicken a variety of sauces, including béchamel, gravy, cheese sauces, and creamy soups, making it a versatile base for many dishes.


I love how you highlighted the versatility of flour choices when crafting a roux! I’ve recently experimented with a blend of all-purpose and spelt flour, and it added such a delightful depth to my sauces. The nuttiness from the spelt really complemented a creamy mushroom sauce I made.